Recipe: 24-Hour Pizza Dough With Spelt Flour
from Tara Jensen's 'Pizza Practice'
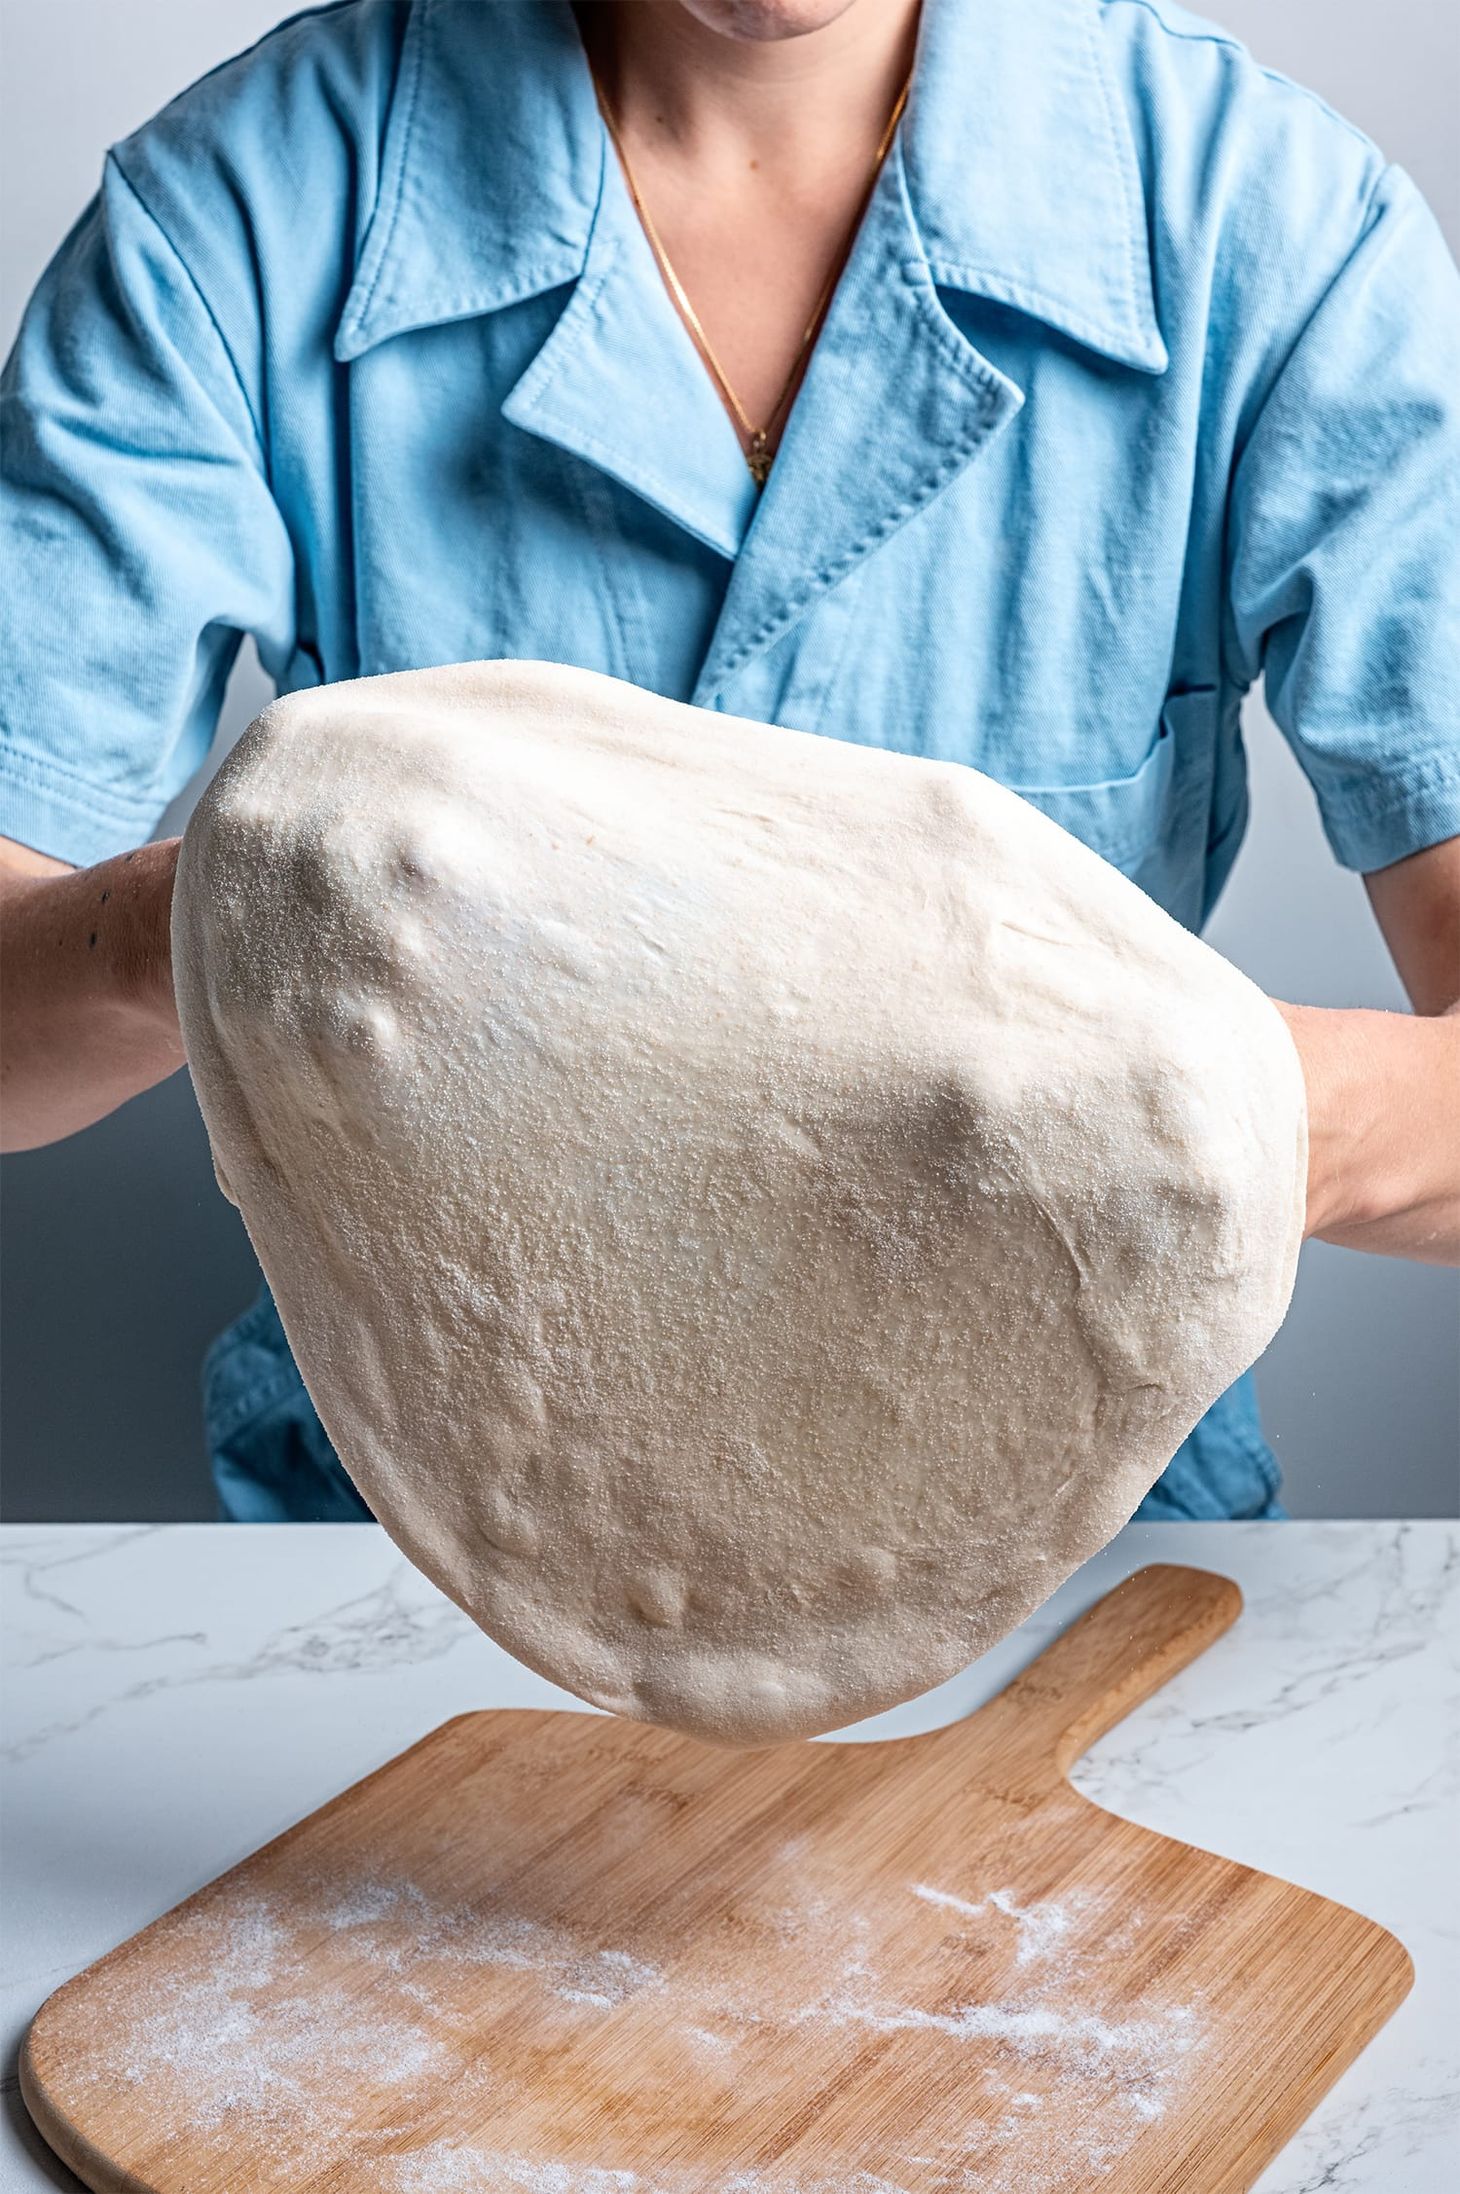
Table of Contents
24-Hour Pizza Dough With Spelt Flour
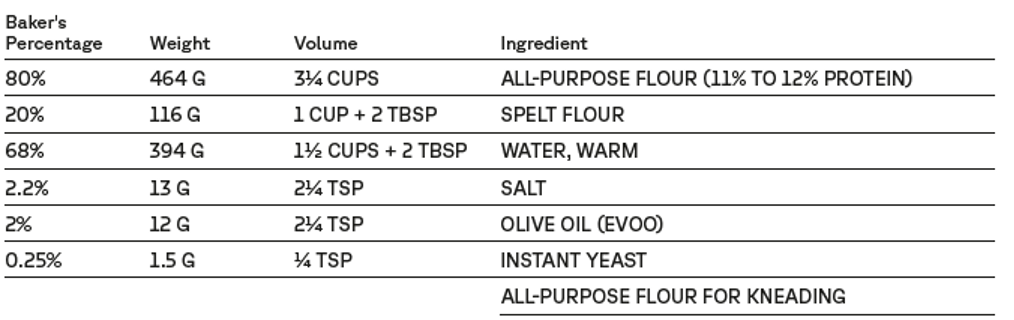
Made with 20 percent spelt flour and a few glugs of olive oil, this dough yields an incredible crust with minimal effort. The spelt flour adds extensibility to the dough, making it easy to stretch, and the olive oil tenderizes the crumb and contributes to bold browning in the oven. Best after a 24-hour cold proof, the dough bakes up with hints of toasty caramel and a toothy, tuggy bite.
MAKES 4 ROUNDS, 250 G [8 ¼ OZ] EACH
DDT 80°F [27°C]
Ready a restaurant-style wide-mouthed water pitcher half full of warm water at 80°F [27°C]. You’ll use water from this pitcher for mixing the dough and then later for wetting your fingers when folding.
In a large mixing bowl, combine the all-purpose flour, spelt flour, and yeast. Quickly stir with a dry hand to blend and aerate, then add the olive oil and water. Next, using your dominant hand in the shape of a claw, agitate the flour and water into a dough. You can use your free hand to stabilize the bowl. Once a sticky dough has formed, grab and squeeze it several times to bring it into a cohesive, shaggy mass. Cover with a shower cap or lid and let rest for 10 minutes.
Return to the bowl and sprinkle the salt over the dough. With your hands in the shape of crab claws, pinch in the salt. You’ll feel the dough tighten. Stop once you have felt the salt dissolve.
When all the ingredients are incorporated, using a dough scraper, turn the dough out onto a lightly floured work surface. Using the heel of your dominant hand, push the top of the dough away from you, then fold it back on itself and rotate it 90 degrees. Push, fold, and rotate again. Repeat this three-step action for 2 to 3 minutes.
A simple kneading is sufficient. It doesn’t have to be lengthy, as even a few strokes will help the gluten absorb water and strengthen. Use as much flour as you need while you work but no more than is necessary. Stop kneading as soon as the dough resists.
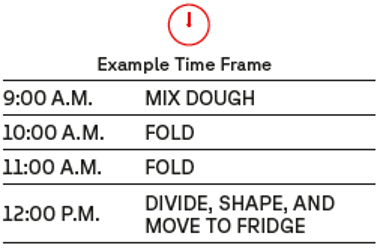
Transfer the dough to a lightly oiled rectangular dough tub or clean mixing bowl and cover with a lid. The dough has now entered bulk fermentation, or the first rise, and will be given two folds before being divided and shaped. Find a warm place for the dough to rise where the temperature will stay around 80°F [27°C] the whole time.
An hour after mixing, fold the dough. To fold, dip your fingers into the warm water in the pitcher. Gently lift the dough straight up from the middle with both hands. One end will release from the container as you pull upward. Allow the loosened end to tuck under the middle of the dough and then repeat with the other side, lifting and tucking toward the middle. The dough will look like it has coiled underneath itself. Rotate the container a quarter turn and repeat the process. Continue rotating the container and folding until the dough doesn’t stretch or spread and has a smooth top. Cover and let rest for 1 hour.
Repeat the folding process and then cover the container and let rest for another hour.
During the hour following the second fold, return to the dough every now and then, uncover the container, and investigate it. It’s ready to divide into individual rounds when it smells yeasty, has risen about 20 percent in the bowl, and slowly springs back when gently prodded. Once the dough is relaxed and feels soft like a pillow, move on to dividing. If it needs a little more time, give it an extra 30 minutes.
To divide the dough, lightly flour your work surface. Using the dough scraper, turn the dough out onto the floured surface so the top is now the bottom and you’re looking at the puffy underbelly. Using a bench knife, divide the dough into four equal portions, making confident, decisive cuts. Now use the bench knife to scoop a hunk of the dough onto the digital scale. Check the weight: You’re looking for the hunk to weigh 250 g [83/4 oz]. Use the bench knife to add or remove dough as needed to reach 250 g [83/4 oz]. (It’s more important to have fewer bits and pieces than it is to have four portions that are exactly equal, so don’t obsess here.) Set the first piece of dough aside and weigh the remaining portions. You may also skip the scale and simply eyeball the weight, accepting that each pizza will be slightly different.
To form a dough portion into a ball, bring the top edge and the bottom edge to meet in the middle and pinch them together. Now gently stretch out the left and right sides and pinch them together over the just-sealed dough. You’ll now have a square of dough. Grab the top left corner and the bottom right corner, stretch them a little, and then pinch them together. Repeat stretching and pinching with the top right corner and bottom left corner. The point where all the gathered portions of dough come together is your seam. The dough will look like a little purse or dumpling. Seal the seam by gently flipping the dough over and dragging it 8 to 10 in [20 to 25 cm] on a dry, flour-free area of the work surface, either cupped in the palm of your hand held in a C shape or nestled against the inside edge of the dough scraper. As you drag, you’ll see the dough noticeably tighten and become smooth. Place the ball seam-side down on a flour-free area of the work surface. Shape the remaining dough.
If you plan to make all the pizzas at once, stagger the rounds in a clean, unoiled dough box, spacing them 1 to 2 in [2.5 to 5 cm] apart. If you want to bake them one at a time, place each round in its own inverted takeout container or meal-prep container, with the dough ball resting on the lid covered by the bottom or bowl, or in a lightly oiled deli container. Refrigerate the rounds for at least 2 hours or up to 24 hours.

From Pizza Practice Doughs, Techniques + Toppings by Tara Jensen, © 2026. Published by Chronicle Books. Photographs © Scott Suchman.
wordloaf Newsletter
Join the newsletter to receive the latest updates in your inbox.

