Recipe: Extra-Sour Sourdough
From Maurizio Leo's 'The Perfect Loaf'
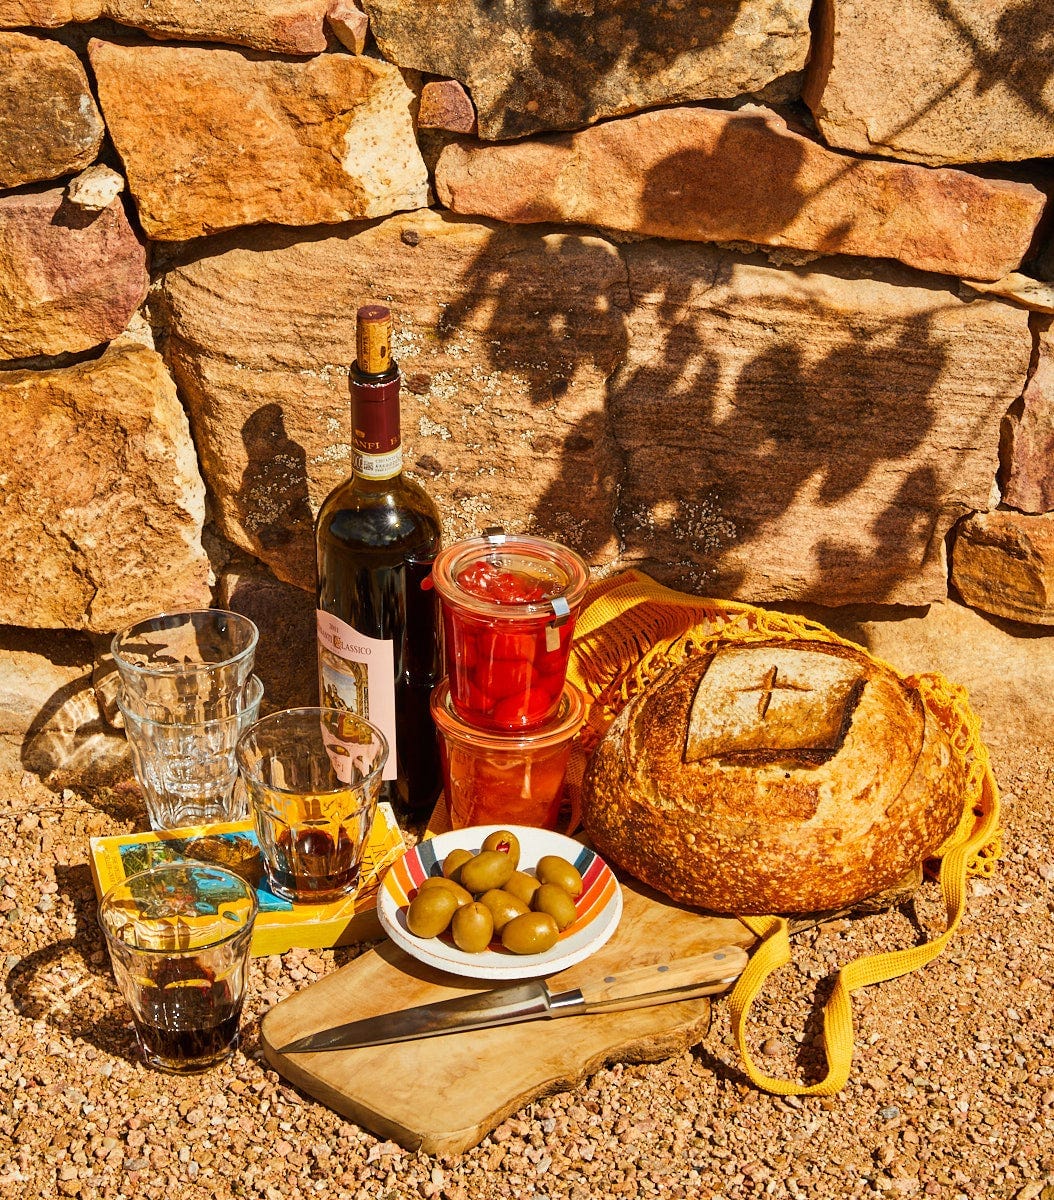
Table of Contents
Extra-Sour Sourdough
Bread with lingering sourness, a crispy crust, and a tighter crumb
“Sour” here isn’t the mouth-puckering variety, but, rather, a sourness that builds quickly and lingers. It’s the kind that gets your mouth watering, like a pleasantly mild vinegar; and when baked dark, as I often do, the crust takes on a toasted nut flavor that complements the increased sourness. This is a delicious bread, and one I find goes incredibly well with aged cheese and olives, seafood, hearty stews, and even a dark beer.
In the following formula, we’re trying to create favorable conditions for increasing bacterial cell population and activity, all with the end goal of increasing the total accumulated acidity in the dough. These conditions are created in a few ways: altering the flour types and amounts, dough temperature, fermentation time, and inoculation percentages. Each of these aspects of breadmaking is a contributing factor to adjusting the sour flavor of a loaf (see Tinkering with Sourness for more detail).
Keep in mind that the following formula and process is not the only way to make a loaf of extra-sour sourdough bread. My hope is that you’ll take some of these lessons into your own baking, working to adjust your favorite recipe to be more or less sour as you desire.
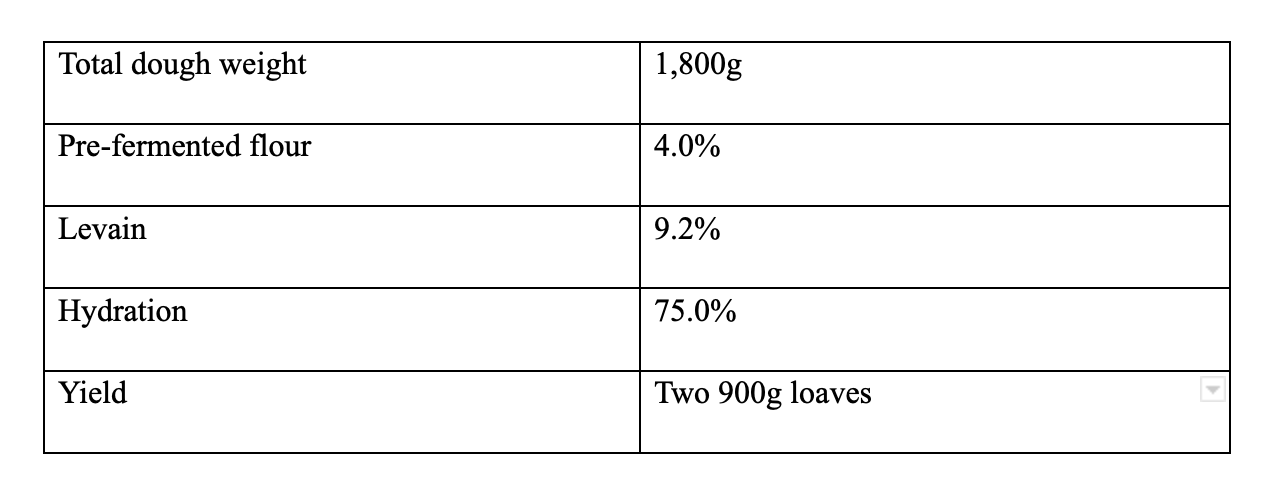
Vitals:
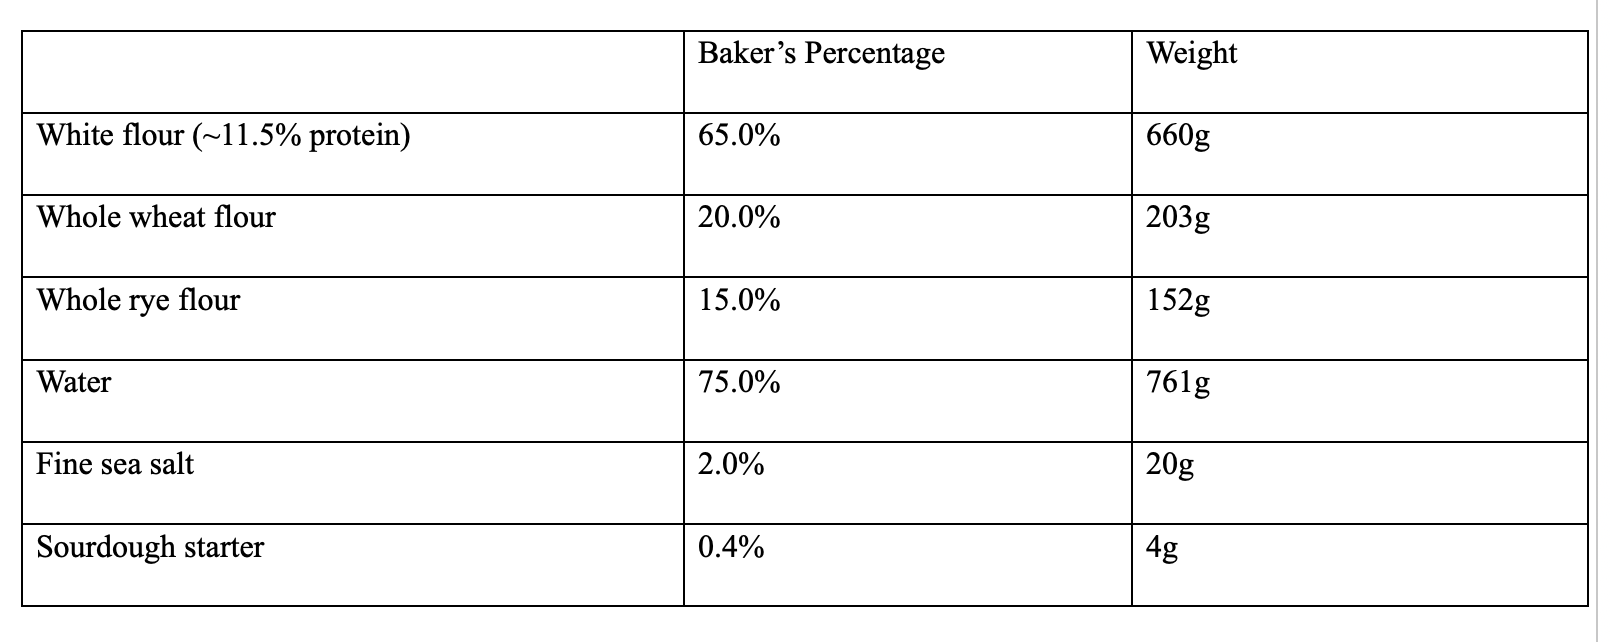
Total Formula:
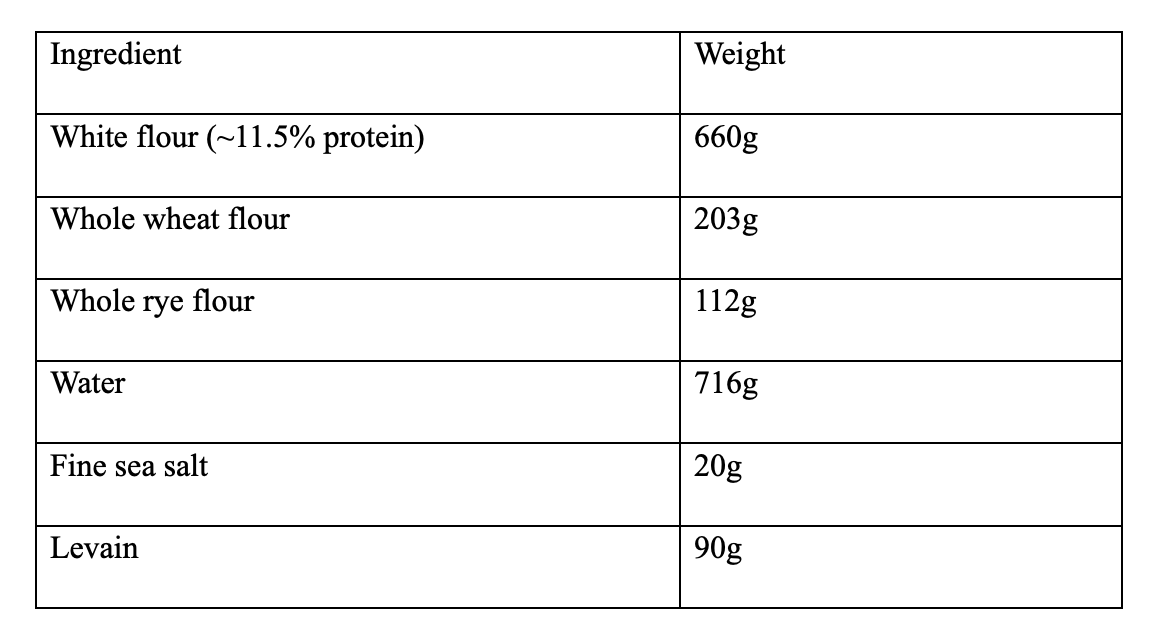
1. Levain
Duration: 12 hours at warm room temperature: 74-76°F (23-24°C)

Mix the levain: Temperature is very important with this levain, so be sure to warm the water to about 82°F (28°C)—yes, it’s warm! In a medium jar, mix the levain ingredients until well incorporated (this liquid levain will feel quite loose) and loosely cover. Store in a warm place for 12 hours.
2. Mix
Desired dough temperature (DDT): 82°F (28°C)
High DDT: In similar fashion as the levain, we want a warm final dough temperature because warmth encourages bacterial activity.
Check the levain: It should show signs of readiness: well aerated, risen, soft, sticky, and with very sharp sour aroma. If the levain is not showing these signs, let ferment 1 hour more and check again.
Mix the dough: Warm the water to about 82°F (28°C). Place the flour, water, salt, and ripe levain in a large bowl. Using wet hands, mix the ingredients until well incorporated.
Strengthen the dough: With wet hands, use the slap and fold method (see page 000) for 3 to 5 minutes to strengthen the dough. This is a lower hydration dough, so it may only take a few minutes to become smoother and begin to hold shape. If it is still shaggy and loose, continue to strengthen for a few more minutes, but don’t worry if it doesn’t smooth out completely. Transfer the dough back to the bowl or another container for bulk fermentation.
Measure the temperature of the dough: Compare it to the DDT and record it as the final dough temperature. Cover the dough.
3. Warm bulk fermentation
Duration: About 2 hours 30 minutes at warm room temperature: 74-76°F (23-24°C)
Folds: 3 sets of stretches and folds at 30-minute intervals
Long Bulk Fermentation: Similar to the levain for this recipe, a longer bulk fermentation—both warm and cold phases—gives the bacteria more time to work and produce more acid overall.
Set the timer and make a note: Write down the current time as the start of bulk fermentation, set a timer for 30 minutes, and let the dough rest in a warm place.
Stretch and fold: When your timer goes off, give the dough one set of stretches and folds. For each set, wet your hands. Grab one side of the dough and lift it up and over to the other side. Rotate the bowl 180 degrees and repeat. Then rotate the bowl one-quarter turn and stretch and fold that side. Rotate the bowl 180 degrees again and finish with a stretch and fold on the last side. The dough should be folded up neatly. Cover and repeat these folds every 30 minutes for a total of 3 sets of stretches and folds.
Let the dough rest: After the last set, cover the bowl and let the dough rest for the remainder of the warm bulk fermentation, about 1 hour.
4. Cold bulk fermentation
Duration: About 12 hours or overnight in a home refrigerator: 39°F (4°C)
Folds: None
Move the dough to the refrigerator: After the warm bulk fermentation, place the covered bulk fermentation container in the refrigerator overnight.
5. Divide and preshape
Divide and preshape the dough: Uncover the bulk fermentation container and, using a bowl scraper, gently scrape the dough onto a clean work surface and use your bench knife to divide the dough directly in half. The dough will feel firm and tacky. If it’s too firm to divide and preshape, let it warm up for 15 minutes, uncovered. Using your bench knife in your dominant hand, and other hand wet to reduce sticking, shape each piece of dough into a loose round. Let the rounds rest for 45 minutes to 1 hour, uncovered. Proceed with shaping once the dough has relaxed outward and is just slightly cold to the touch.
6. Shape
Prepare proofing baskets: Line two proofing baskets or bowls with clean kitchen towels. Dust lightly and evenly with white flour.
Shape the dough: Shape each as a boule or a bâtard. Gently transfer each piece to a proofing basket, seam-side up. Place each basket inside an airtight reusable plastic bag and seal.
7. Warm proof
Duration: 1 hour at warm room temperature: 74-76°F (23-24°C)
Let the dough proof: Place the baskets in a warm place to proof for 1 hour.
8. Cold proof
Duration: About 12 hours or overnight in a home refrigerator: 39°F (4°C)
Let the dough proof: Place the baskets in the refrigerator to proof overnight.
Cold Proofing = More Sour
Proofing the dough in a home refrigerator, which is usually around 39°F (4°C), allows bacteria to continue functioning (although at a reduced rate) while most yeast activity slows down significantly. The result is increased acid—especially acetic acid—accumulation in the final loaves. This is more effective near, and below, 46°F (8°C), which the dough will pass through as it’s cooling from warm room temperature down to ambient refrigerator temperature.
9. Bake
Duration: 50 to 55 minutes in the oven
Choose your steaming method: This recipe can be baked in a Dutch oven/combo cooker directly or on a baking stone/steel with a steaming pan at the bottom of the oven.
Prepare the oven: Place an oven rack in the bottom third of the oven with no rack above it. Preheat a Dutch oven/combo cooker or baking stone/steel along with the oven and if using a steaming pan with lava rocks, add it to the bottom of the oven. Preheat the oven to 450°F (230°C) for at least 30 minutes if baking in a pot, or 1 hour if using a baking surface.
Score the dough: Take one of the proofing baskets out of the fridge, uncover, and put a piece of parchment paper over the basket. Place a pizza peel or inverted baking sheet on top of the parchment and, using both hands, flip everything over. Gently remove the basket and score the dough.
Bake the dough: Slide the dough into the preheated Dutch oven or onto the baking surface. Steam the oven: Either cover the Dutch oven or pour a cup of ice into the preheated steaming pan. Bake for 20 minutes. Vent the oven of steam: uncover the Dutch oven and remove the lid or remove the steaming pan. Continue to bake for 30 to 35 minutes, or until the internal temperature reaches 206°–210°F (96°–99°C) and the crust has a deep mahogany color and a crackle/crunch when gently squeezed.
Finish and cool: Let the loaf cool on a wire rack for 1 to 2 hours before slicing. For the second loaf, preheat the Dutch oven or baking surface for 15 minutes and repeat.
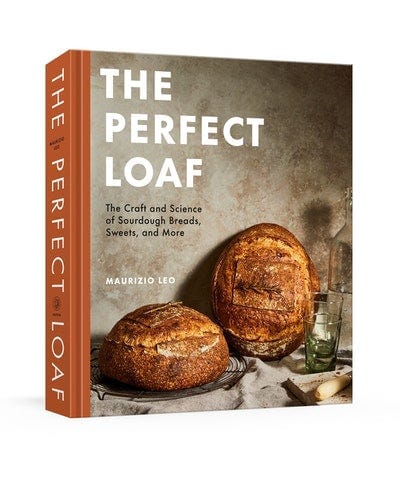
Reprinted from The Perfect Loaf, Copyright © 2022 by Maurizio Leo. Photographs copyright © 2022 by Aubrie Pick and Maurizio Leo. Published by Clarkson Potter, an imprint of Random House.
wordloaf Newsletter
Join the newsletter to receive the latest updates in your inbox.
